How to edit the money format
Thank you for installing the app. Follow these steps to get started:
Note: Having the correct currency formatting outlined below is necessary for the app to function as expected.
1
On your Shopify admin home page, click Settings.
 2
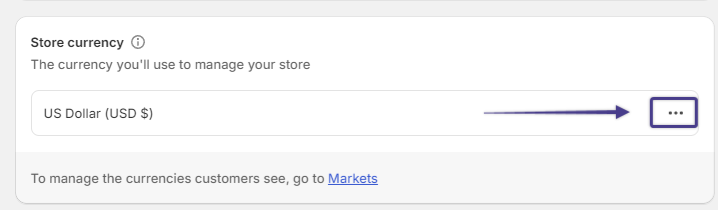
Scroll down and go to your Store Currency section and click the Ellipsis(…) icon.
2
Scroll down and go to your Store Currency section and click the Ellipsis(…) icon.
3
Click Change currency formatting.
 4
Take note of the two fields you will edit: HTML with currency and HTML without currency.
4
Take note of the two fields you will edit: HTML with currency and HTML without currency.
 5
Enter the snippets below in the fields mentioned above. Change the currency symbol($) and abbreviation(USD) in the HTML snippet to your store's default currency. In this example, we are entering the snippet using the USD currency as shown below.
5
Enter the snippets below in the fields mentioned above. Change the currency symbol($) and abbreviation(USD) in the HTML snippet to your store's default currency. In this example, we are entering the snippet using the USD currency as shown below.
HTML with currency:
<span class=money>${{amount}} USD</span>
HTML without currency:
<span class=money>${{amount}}</span>
Another Example: If your store's default currency is UK Pound, then the HTML snippets should be as follows:
HTML with currency:
<span class=money>£{{amount}} GBP</span>
HTML without currency:
<span class=money>£{{amount}}</span>
Note: If your default currency is not in the examples above, just insert the currency symbol and the abbreviation of your store's default currency in the HTML snippets. Replace the characters as seen in the screenshot below:

6
Click Save.
 7
Turn on the Auto Currency Conversion Status by sliding the button to the ON position to activate the app.
7
Turn on the Auto Currency Conversion Status by sliding the button to the ON position to activate the app.
 8
Click Save.
8
Click Save.
 9
Click Go to the theme apps section button and enable the app in your theme's app embeds. See the article Enabling the app for detailed instructions.
9
Click Go to the theme apps section button and enable the app in your theme's app embeds. See the article Enabling the app for detailed instructions.
 10
That's it! When you go to your store, the app's currency widget should now be visible and your site visitors should now be able to convert your product prices to their local currency.
10
That's it! When you go to your store, the app's currency widget should now be visible and your site visitors should now be able to convert your product prices to their local currency.
Here is a short video that shows the setup from start to finish 😊

